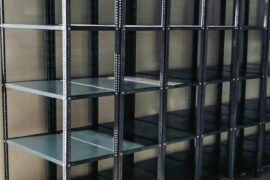
Slotted angle racks offer an effective and adaptable storage solution suitable for a wide range of settings, such as warehouses, offices, retail shops, and even homes. Their flexible design, simple assembly process, and robust construction make them a go-to option for anyone looking to make the most of their storage space and keep items organized. In this comprehensive guide, we’ll walk you through the step-by-step process of assembling a slotted angle rack system, helping you take full advantage of its features to meet your storage requirements.

1. Planning Your Slotted Angle Rack System
Before you start assembling your slotted angle rack, it’s crucial to plan the setup. Consider the following factors:
- Space Availability: Measure the area where you plan to install the racks. Ensure there’s enough space for the racks and for you to move around comfortably.
- Storage Needs: Identify what items you’ll be storing. Consider the size, weight, and frequency of access to these items to determine the ideal configuration.
- Future Expansion: Plan for future storage needs. Opt for a setup that can be easily expanded or reconfigured as your requirements grow.
2. Gathering Necessary Materials and Tools
To set up a slotted angle rack system, you’ll need the following materials and tools:
- Slotted Angles: These are the vertical and horizontal beams that form the structure of the rack.
- Shelves: Typically made of metal or wood, shelves provide the surface for storing items.
- Nuts and Bolts: These fasteners hold the structure together.
- Corner Plates: These provide additional stability at the joints.
- Measuring Tape: To ensure accurate measurements.
- Level: To ensure the rack is assembled straight.
- Wrench or Spanner: For tightening nuts and bolts.
- Rubber Mallet: For adjusting and securing components without damaging them.
3. Step-by-Step Assembly Process
Step 1: Layout the Components
Begin by laying out all the components on the floor in the order you plan to assemble them. This helps ensure you have all necessary parts and allows you to visualize the final structure.
Step 2: Assemble the Frame
- Vertical Angles: Start with the vertical angles. These will form the upright supports for your rack. Attach the corner plates to the ends of the vertical angles using nuts and bolts.
- Horizontal Angles: Next, attach the horizontal angles to the vertical ones, forming the basic frame of the rack. Ensure all connections are secure but don’t fully tighten the bolts yet, as adjustments may be needed.
Step 3: Install the Shelves
- Place the shelves on the horizontal angles at your desired heights. Ensure the shelves are level and adjust the horizontal angles if necessary.
- Secure the shelves in place with additional nuts and bolts. Tighten all connections once you’re satisfied with the alignment.
Step 4: Stabilize the Rack
- Check the entire structure for stability. Use the level to ensure the rack is straight and adjust as needed.
- Tighten all nuts and bolts fully to ensure the rack is stable and secure.
4. Optimizing Your Slotted Angle Rack System
Once your slotted angle rack system is assembled, consider these tips to optimize its use:
- Label Shelves: Clearly label each shelf to make it easy to locate and access items.
- Use Bins and Containers: Store smaller items in bins or containers to keep them organized and prevent clutter.
- Weight Distribution: Distribute weight evenly across the shelves to prevent tipping or bending.
- Regular Maintenance: Periodically check the rack for loose bolts or damage. Regular maintenance will ensure the longevity and safety of your storage system.
5. Safety Considerations
While slotted angle racks are generally safe and sturdy, keep these safety considerations in mind:
- Weight Limits: Adhere to the manufacturer’s recommended weight limits for each shelf to prevent accidents.
- Secure the Rack: If the rack is tall or will hold heavy items, consider securing it to the wall or floor for added stability.
- Avoid Overloading: Do not overload the shelves, as this can lead to structural failure and potential injury.
6. Expanding and Modifying Your Rack System
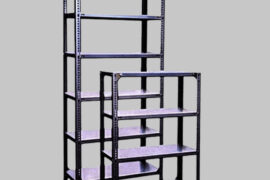
One of the key advantages of slotted angle racks is their modularity. You can easily expand or modify your rack system as your storage needs evolve. To add new shelves or sections:
- Disassemble as Needed: Loosen the nuts and bolts at the desired points of expansion.
- Add New Components: Integrate additional vertical and horizontal angles, shelves, and fasteners.
- Re-secure and Stabilize: Tighten all connections and ensure the entire structure remains stable and secure.
Conclusion
Setting up a slotted angle rack system is a straightforward and rewarding process that offers numerous benefits for your storage needs. By following this ultimate guide, you can create a customized, efficient, and durable storage solution that maximizes your available space and keeps your items organized.
Whether you’re a business owner looking to optimize warehouse space or a homeowner seeking a practical storage solution, slotted angle racks are an excellent choice. Their versatility, ease of assembly, and durability make them a valuable addition to any setting.
For high-quality slotted angle racks and expert advice on setting up your storage system, visit Rida Racks. Rida Racks offers a wide range of options and customizable configurations to help you create the perfect storage solution. Enhance your organization and efficiency with the best slotted angle racks available.